Refer and earn for every successful referral. Also, the most active user wins ₦5,000 in cash!
, Check Verification Solution Hub Groupes Pages Marketplace Evènements Blogs Financement Offres Emplois Courses Film Jeux Merits
How to Set Up Avatarify on Windows: Step-by-Step Guide
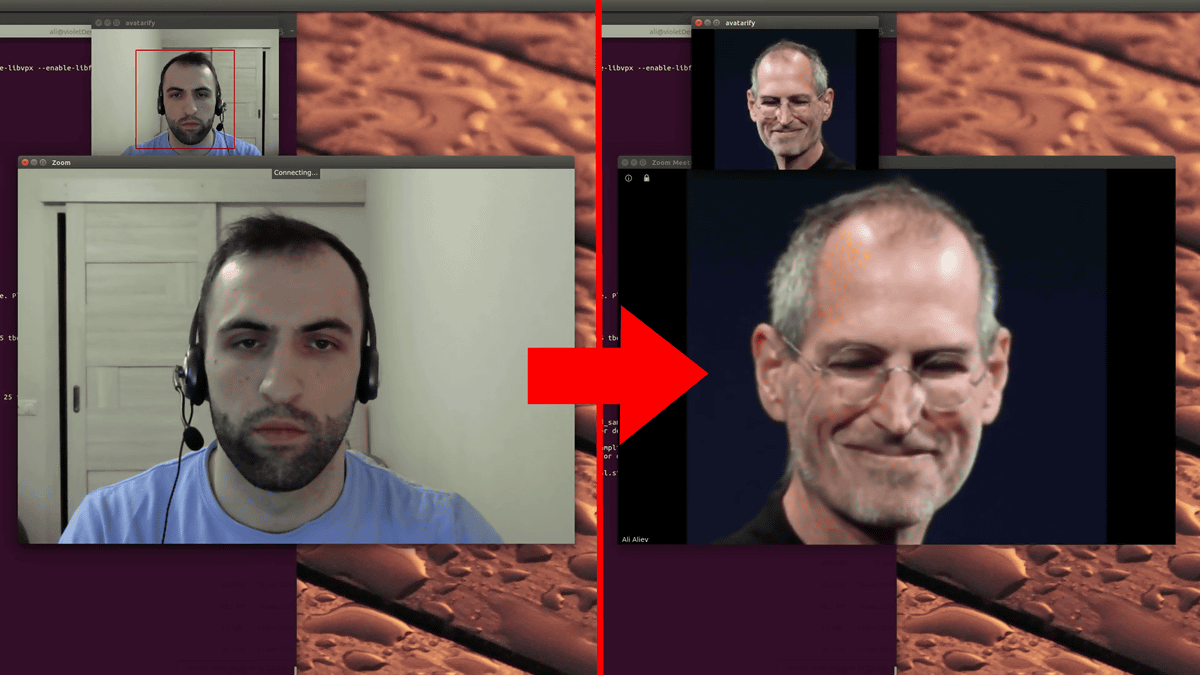
If you’ve ever wanted to animate your face with real-time avatars for Zoom, Twitch, Skype, or other streaming platforms, Avatarify is the tool you need. Avatarify uses artificial intelligence to map your facial expressions onto another image or avatar, making your virtual presence more fun and engaging.
In this guide, we’ll walk you through the steps to install and set up Avatarify on Windows so you can start using it right away.
What is Avatarify?
Avatarify is an open-source software that lets you animate avatars in real time using deep learning. With it, you can appear in online meetings as celebrities, cartoon characters, or even memes. It works by tracking your face and overlaying it onto another image using AI-powered models.
Prerequisites for Installing Avatarify on Windows
Before setting up Avatarify, ensure you have:
-
A Windows 10 or 11 PC (64-bit recommended).
-
A webcam for real-time facial tracking.
-
A good GPU (NVIDIA CUDA-capable) for better performance. (It can run on CPU, but slower.)
-
Installed Python 3.7 or later.
-
Installed Git (for cloning the repository).
-
Installed OBS Studio or Zoom if you want to use Avatarify in video calls.
Steps to Install Avatarify on Windows
1. Install Python and Git
-
Download and install Python.
-
During installation, check “Add Python to PATH.”
-
-
Download and install Git for Windows.
2. Clone Avatarify Repository
-
Open Command Prompt or PowerShell.
-
Run the following command:
git clone https://github.com/alievk/avatarify-python.git
-
Navigate into the folder:
cd avatarify-python
3. Set Up Virtual Environment
-
Create a virtual environment:
python -m venv venv
-
Activate it:
venv\Scripts\activate
4. Install Dependencies
Run the following command to install required libraries:
pip install -r requirements.txt
If you have a CUDA-capable GPU, install PyTorch with CUDA support from PyTorch’s official website.
5. Download Pre-trained Models
Avatarify needs AI models to work. Run the following command:
python scripts/download_models.py
This will download all required deep learning models.
6. Run Avatarify
To start Avatarify, run:
python avatarify.py
The program will open a window where you can choose avatars and control them using your webcam.
7. Connect Avatarify to Zoom or Other Apps
-
Install a virtual camera driver like OBS Studio with OBS-VirtualCam.
-
Add the Avatarify window as a source in OBS.
-
Start the virtual camera in OBS.
-
In Zoom/Skype/Teams, change your camera to OBS Virtual Camera.
Now your animated avatar will appear live in video calls!
Tips for Best Performance
-
Use a GPU-powered PC for smooth real-time performance.
-
Choose high-quality avatars with clear facial features.
-
Close unnecessary apps to free up system resources.
-
Experiment with different avatars to make your calls more engaging.
Finally
Setting up Avatarify on Windows might seem technical at first, but by following the steps above, you’ll be running AI-powered avatars in no time. Whether you’re using it for Zoom meetings, Twitch streams, or just having fun with friends, Avatarify will make your online presence unforgettable.
Catégories
- Make Money
- Product Review
- Social Media
- Excel
- Graphics design
- Freelancing/Consulting
- E-commerce and Digital Marketing
- Business
- Self Development
- Tips to Success
- Video Editing
- Photo Editing
- Website Promotion
- YouTube
- Computer
- Téléphone
- Music
- Spirituality & Faith
- École
- Tech & Digital
- Gaming
- News
- Digital Economy / Technology
- Relation
- Creative Arts & Design
- Medical
- Causes
- Networking
Lire la suite
Building a strong foundation for your future is essential for creating a life of stability, growth, and lasting success. While dreaming big is important, dreams alone won’t create the life you envision. To thrive in a dynamic world, you need a solid base — a framework of habits, mindset, skills, and resources that supports every long-term goal. This guide breaks down how to build...

Over the past decade, Nigeria has witnessed a remarkable transformation — from being primarily an oil-dependent economy to becoming one of the fastest-growing tech hubs in Africa. With innovation hubs springing up across major cities like Lagos, Abuja, and Port Harcourt, Nigeria is positioning itself as the “Silicon Valley of Africa.” But what exactly is driving this growth?...

The 21st century is unfolding faster than any era before it. Industries are evolving overnight, technology is rewriting the rules of work and life, and global shifts are challenging old systems. In the middle of all this transformation, one skill has quietly risen above the rest as the ultimate key to success: adaptability. Today, it doesn’t matter whether you’re a business...

Introduction Self-discipline and willpower are two fundamental traits that define personal success and self-improvement. These qualities help individuals stay focused on their goals, resist temptations, and persist through challenges. While self-discipline is the ability to regulate behavior over time, willpower is the inner strength to make choices that align with long-term objectives rather...
In the past, having a good idea was rarely enough to generate income. Ideas needed factories, investors, physical infrastructure, and long approval processes. Today, that reality has changed. Young innovators across the world are proving that ideas—when paired with execution and digital leverage—can become income-generating assets. The modern economy rewards problem-solvers, not...